

How to Nurture Leads and Turn Them Into Paying Customers

As you’re well aware, converting leads into paying customers is a delicate process that requires a deep understanding of their unique needs and pain points. You’ve likely invested significant time and resources into generating leads, but now it’s time to nurture them into customers. The question is, where do you start? By mapping your leads’ journeys, you can identify areas where they need guidance, support, or education. But what specific strategies can you use to build trust, establish credibility, and ultimately drive conversions? The answer lies in developing a tailored lead nurturing approach that resonates with their needs and preferences – but how do you do that effectively? 士業.
Understanding Your Lead’s Journey
As you delve into the world of lead nurturing, it’s essential to recognize that each lead is on a unique journey.
They’re not just names on a list; they’re individuals with distinct pain points, goals, and timelines. You need to understand their motivations, challenges, and aspirations to create a nurturing strategy that resonates with them.
To get started, you must identify the different stages of your lead’s journey.
This might include awareness, consideration, and decision-making. Each stage requires a tailored approach, as your lead’s needs and concerns evolve over time.
By mapping their journey, you can pinpoint areas where they need guidance, support, or education.
You should also analyze your lead’s behavior, such as their engagement with your content, website interactions, and social media activity.
This helps you gauge their level of interest, identify potential roadblocks, and adjust your nurturing strategy accordingly.
Building Trust With Personalized Content
You’ve mapped your lead’s journey and analyzed their behavior, now it’s time to build trust by speaking directly to their needs.
Personalized content is key to establishing a connection with your leads and moving them further along in the sales funnel. By tailoring your content to their specific pain points and interests, you’re showing them that you understand and care about their unique challenges.
Create content that addresses their concerns and provides value.
This can be in the form of targeted email campaigns, blog posts, or social media messages. Use language and tone that resonates with your lead, and avoid generic, one-size-fits-all approaches.
By doing so, you’ll build trust and credibility, increasing the likelihood that they’ll become paying customers.
Remember, the goal is to educate and inform, not to make a hard sell.
Focus on providing value, and the sales will follow naturally.
Identifying and Prioritizing Quality Leads
Your sales funnel is filled with leads, but not all of them are created equal.
You need to identify and prioritize quality leads to maximize your conversion rates.
Start by analyzing your leads’ behavior and engagement. Are they opening your emails, clicking on links, or attending webinars? Are they downloading whitepapers or case studies?
These actions indicate a level of interest and investment in your product or service.
Next, assess their fit for your solution.
Do they’ve the budget, authority, need, and timeline (BANT) to make a purchase?
You can use tools like lead scoring to quantify their fit and behavior.
Assign scores based on their actions and demographics, and then prioritize leads with higher scores.
You can also use CRM data to identify patterns and common characteristics among your existing customers and apply those to your lead evaluation.
Developing a Lead Nurturing Strategy
Now that you’ve identified and prioritized quality leads, it’s essential to guide them through the buyer’s journey with a well-planned lead nurturing strategy.
This strategy should be tailored to your leads’ specific needs, pain points, and interests. By doing so, you’ll build trust, establish your brand as an authority, and ultimately, move them closer to conversion.
To develop an effective lead nurturing strategy, you need to understand your leads’ buying behaviors and preferences.
Segment your leads based on their demographics, behaviors, and firmographic data. This will enable you to create targeted content and messaging that resonates with each group.
Next, map out the buyer’s journey and identify the key touchpoints where you’ll engage with your leads.
This could include email campaigns, social media, content marketing, and sales outreach. Set clear goals and objectives for each touchpoint, and ensure that they align with your overall lead nurturing strategy.
Measuring and Optimizing Lead Conversion
Lead conversion is the ultimate goal of any lead nurturing strategy, and measuring its success is crucial to refining your approach.
To do this, you need to track key performance indicators (KPIs) that reveal how well your strategy is working.
Start by monitoring lead response rates, conversion rates, and the time it takes to convert leads into customers.
You should also track the quality of leads, the sources that generate the most conversions, and the return on investment (ROI) of your lead nurturing efforts.
Conclusion
You’ve got a solid foundation for nurturing leads and converting them into paying customers. By understanding their journey, building trust with personalized content, identifying and prioritizing quality leads, and developing a tailored strategy, you’ll be well on your way to driving revenue growth. Now, it’s time to measure and optimize your lead conversion efforts to maximize ROI. With a data-driven approach, you’ll refine your strategy and turn more leads into loyal customers.
Tax Deductions for GPU Hardware What You Need to Know

As someone who relies on GPU hardware for business purposes, you’re likely wondering if you can write off those expensive graphics cards on your taxes. The good news is that you might be eligible for tax deductions, but it’s crucial to understand the rules. You’ll need to separate business use from personal use, and accurately document your expenses to claim those deductions. But what exactly constitutes a deductible business expense, and how do you calculate the business use percentage? You’ll want to get it right to avoid any issues with the IRS – and that’s where we’ll pick up next. GPUサーバー 節税.
Eligible Groups for Tax Deductions
Can you claim tax deductions for your GPU hardware? If you’re part of certain groups, the answer is yes.
As a self-employed individual, freelancer, or independent contractor, you can claim tax deductions for your GPU hardware if it’s used for business purposes. This includes graphic designers, video editors, 3D modelers, and other professionals who rely on GPU-intensive software.
You’re also eligible if you’re an entrepreneur or small business owner who uses GPU hardware for business operations.
For instance, if you own a gaming center or a cryptocurrency mining operation, you can claim tax deductions for your GPU hardware. Additionally, researchers and scientists who use GPU hardware for their work can also claim deductions.
It’s essential to keep accurate records of your business use, including receipts, invoices, and usage logs.
This will help you calculate the business use percentage of your GPU hardware and claim the corresponding tax deduction.
Remember to consult with a tax professional to ensure you’re meeting all the necessary requirements and following the correct procedures.
Business Use Vs Personal Use
You’ve established that you’re part of an eligible group for tax deductions on your GPU hardware, but now it’s time to separate your business use from personal use.
This distinction is crucial because the IRS only allows deductions for business-related expenses. To accurately claim deductions, you’ll need to track and record the percentage of business use versus personal use for your GPU hardware.
For example, if you’re a freelance graphic designer who uses their GPU for 80% of their work and 20% for personal gaming, you’ll only be able to deduct 80% of the hardware costs.
You can use a log or spreadsheet to track your usage, noting the dates, times, and purposes of each use. You can also use software or apps that monitor and report on your GPU usage.
Having a clear and accurate record of your business use percentage will help you avoid potential audit issues and ensure you’re taking advantage of the deductions you’re eligible for.
What GPU Hardware Is Deductible
Your GPU hardware is a significant investment, and understanding what’s deductible is crucial for maximizing your tax savings.
You can deduct the cost of GPU hardware that’s used for business purposes, such as graphics cards, motherboards, and RAM. This includes hardware used for tasks like video editing, 3D modeling, and cryptocurrency mining.
If you’re a gamer, you can’t deduct the cost of GPU hardware used solely for personal gaming purposes. However, if you use your gaming GPU for business purposes, such as streaming or creating content, you can deduct the business use percentage of the hardware cost.
You can also deduct the cost of accessories like GPU coolers, power supplies, and cases if they’re used for business purposes. Additionally, you can deduct the cost of software used for business purposes, such as video editing software or cryptocurrency mining software.
It’s essential to keep in mind that you can only deduct the cost of hardware and software used for business purposes, not personal use.
Documenting GPU Hardware Expenses
Accurate record-keeping is vital when it comes to documenting GPU hardware expenses for tax deductions.
You’ll need to keep track of every purchase, including receipts, invoices, and bank statements. Make sure to save digital copies of these documents, as well as physical copies, in case you need to refer to them later.
When documenting your expenses, be sure to include the date of purchase, the itemized list of what you bought, and the total cost.
You should also keep records of any warranties, serial numbers, and product descriptions. If you’ve purchased any additional accessories or software, be sure to include those in your records as well.
It’s also essential to keep records of how you use your GPU hardware for business purposes.
This can include logs of the time you spend using the hardware, notes on the projects you’re working on, and any other relevant information.
Claiming GPU Hardware Deductions
Claiming GPU hardware deductions requires a thorough understanding of the tax laws and regulations that apply to your business.
You must ensure you’re eligible to claim these deductions and that you’ve properly documented your expenses.
If you’re a sole proprietor, you’ll report your business income and expenses on Schedule C of your tax return.
You’ll claim your GPU hardware deductions on Line 12, “Business Use of Your Home” or Line 13, “Depreciation and Amortization.”
If your business is a partnership or S corporation, you’ll report your business income and expenses on Form 1065 or Form 1120S, respectively.
You’ll claim your GPU hardware deductions on Schedule K-1, which will then flow through to your personal tax return.
You must also complete Form 4562, “Depreciation and Amortization,” to claim depreciation deductions for your GPU hardware.
Remember to keep accurate records, including receipts, invoices, and bank statements, to support your claims in case of an audit.
It’s also a good idea to consult with a tax professional to ensure you’re taking advantage of all the deductions you’re eligible for.
Conclusion
You’ve got the necessary information to claim tax deductions for your GPU hardware. Now it’s essential to keep accurate records, separate business from personal use, and document expenses. By doing so, you’ll be able to calculate the business use percentage and claim deductions on your tax return. Remember, only business-related expenses are eligible, so keep those receipts and logs handy. Stay organized, and you’ll be on your way to maximizing your tax savings.
How Much Do Timber Frame Kits Cost?
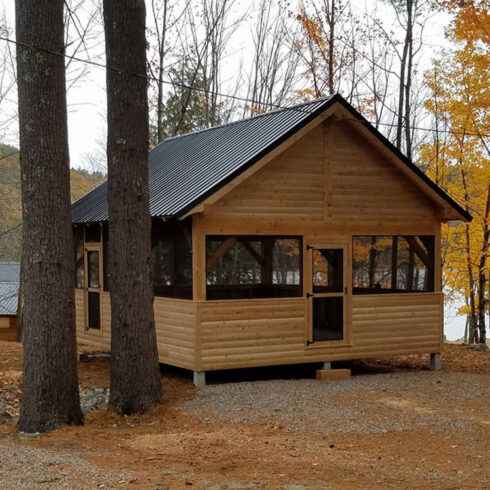
As you start planning your dream timber frame home, one question likely stands out: how much will it cost? The answer isn't simple, as prices vary widely depending on the size, design, and quality of materials. You might be surprised to learn that a small kit for a tiny home can start at around $30,000, while a larger, more luxurious option can reach half a million dollars or more. But what factors drive these costs, and how can you budget accordingly? Let's break down the numbers to get a clearer picture of what to expect.
Understanding Timber Frame Kit Pricing
When it comes to building your dream home, understanding timber frame kit pricing is crucial to staying within budget.
You'll want to know what to expect when it comes to the cost of the kit itself, as well as any additional expenses that may arise during the construction process.
A timber frame kit typically includes the pre-cut and pre-assembled frame, along with necessary fasteners and hardware.
The cost of the kit will depend on the size and complexity of your design, as well as the type and quality of materials used.
You should also consider the cost of labor, as you'll need to hire a contractor or builder to assemble the kit on-site.
This can add a significant amount to your overall cost, so be sure to factor it in when creating your budget.
Additionally, you may need to purchase additional materials, such as roofing, windows, and doors, which can also impact your bottom line.
Factors Affecting Kit Costs
Your dream home's design plays a significant role in determining the cost of your timber frame kit. The complexity of your design, including the number of corners, curves, and angles, will impact the cost.
A simple, rectangular design will be less expensive than a complex, multi-angled one.
The size of your home is another significant factor. The larger your home, the more materials and labor are required, increasing the cost.
Additionally, the type and quality of materials you choose will affect the cost. Higher-grade timbers, such as oak or walnut, will be more expensive than standard pine or spruce.
You'll also need to consider the level of customization you require. If you want custom designs, unique features, or special requests, you'll pay more.
Furthermore, the location where you're building your home can impact the cost due to varying transportation costs, labor rates, and local building codes.
Lastly, the manufacturer's experience, reputation, and warranty offered will also influence the final cost of your timber frame kit.
Average Costs for Small Homes
As you plan your small timber frame home, you're likely wondering what kind of budget you'll need to allocate.
The cost of a small timber frame kit can vary depending on several factors, including the size, design, and materials used.
On average, a small timber frame kit can cost between $30,000 and $60,000.
For a tiny home with a floor area of around 500-700 square feet, you can expect to pay around $30,000 to $40,000.
This price range includes the frame, roofing, and siding, but may not include additional features like windows, doors, and electrical systems.
If you're looking to build a slightly larger home with a floor area of around 1,000-1,500 square feet, the cost can range from $40,000 to $60,000.
Keep in mind that these prices are only estimates, and the final cost of your timber frame kit will depend on your specific design and material choices.
Be sure to work closely with your supplier to get an accurate quote for your project.
Mid-Size Home Kit Prices
Moving up in size, mid-size timber framing kits cater to homeowners seeking more space without sacrificing the charm of a timber frame home.
You'll find these kits typically range from 1,500 to 3,000 square feet, offering a comfortable balance between space and budget.
Mid-size kits usually include two to four bedrooms, two to three bathrooms, and an open living area.
You can expect to pay between $60,000 and $150,000 for a mid-size kit, depending on the complexity of the design, materials, and features.
This price range translates to around $40 to $70 per square foot.
Keep in mind that these prices are only for the kit itself and don't include labor costs, site preparation, or finishing materials like flooring, cabinets, and countertops.
Additionally, factors like roof complexity, window sizes, and door styles can impact the final cost.
As you explore mid-size timber frame kits, consider your specific needs and budget to find the perfect balance for your dream home.
Large and Luxury Kit Options
Large and luxury timber frame kits cater specifically to homeowners who want to create a grand, opulent space that showcases the beauty of timber frame construction.
These kits typically feature larger, more complex designs with soaring ceilings, expansive great rooms, and lavish master suites. You'll often find premium materials, such as reclaimed or exotic woods, used throughout the structure.
As you'd expect, the prices for these luxury kits reflect their high-end features. You can expect to pay anywhere from $150,000 to $500,000 or more, depending on the size and complexity of the design.
The cost per square foot can range from $100 to $250 or more, making these kits a significant investment.
Keep in mind that these prices may not include additional features like electrical, plumbing, and HVAC systems, which can add tens of thousands of dollars to the final cost.
If you're looking to create a truly bespoke timber frame home, be prepared to invest in a luxury kit that meets your high standards.
Conclusion
You've got a better understanding of timber frame kit pricing, and it's clear that costs vary greatly. From small kits for tiny homes to large and luxury options, prices range from $30,000 to $500,000 or more. Remember to factor in additional costs for labor, site prep, and finishing materials to avoid surprises. With this info, you can now plan your budget and make informed decisions when choosing a timber frame kit that fits your needs and wallet.
